Discover the Sweet Secret: Crafting Irresistible Cake Truffles at Home
There's a special kind of culinary magic that happens when you take something familiar and transform it into an entirely new, decadent delight. This is precisely the allure of a delicious cake truffles recipe. Imagine capturing all the joyous flavor of your favorite cake – be it a celebratory vanilla, a rich chocolate, or a vibrant red velvet – and compressing it into a bite-sized, melt-in-your-mouth sphere, elegantly coated in chocolate. These aren't just treats; they're miniature masterpieces, perfect for any occasion, or simply to satisfy a sudden sweet craving.
Cake truffles, often affectionately known as cake pops without the stick, offer an incredible versatility that makes them a favorite among home bakers. They're a brilliant solution for repurposing leftover cake, transforming what might otherwise go to waste into an even more exciting dessert. Beyond their resourcefulness, they're also a fantastic way to elevate a simple box mix into something truly gourmet. Whether you're planning for a bridal shower, a holiday gathering, a birthday bash, or just seeking a unique homemade gift, a well-executed cake truffles recipe promises a memorable experience in every bite. For additional ideas on how to make your truffles stand out, explore cake truffles recipe - Article 1, which delves into unique flavor pairings.
The Art of Transformation: Why Cake Truffles Are Pure Bite-Sized Bliss
What is it about cake truffles that makes them so utterly irresistible? It’s the seamless marriage of textures and flavors. You start with the soft, tender crumb of cake, which is then blended with a rich, creamy frosting, creating a dense, moist core. This delightful center is then enveloped in a crisp, often snappy, chocolate shell, offering a satisfying contrast that gives way to the smooth interior. The result is a concentrated burst of flavor that evokes all the nostalgia and sweetness of a full slice of cake, but in a perfectly portioned morsel.
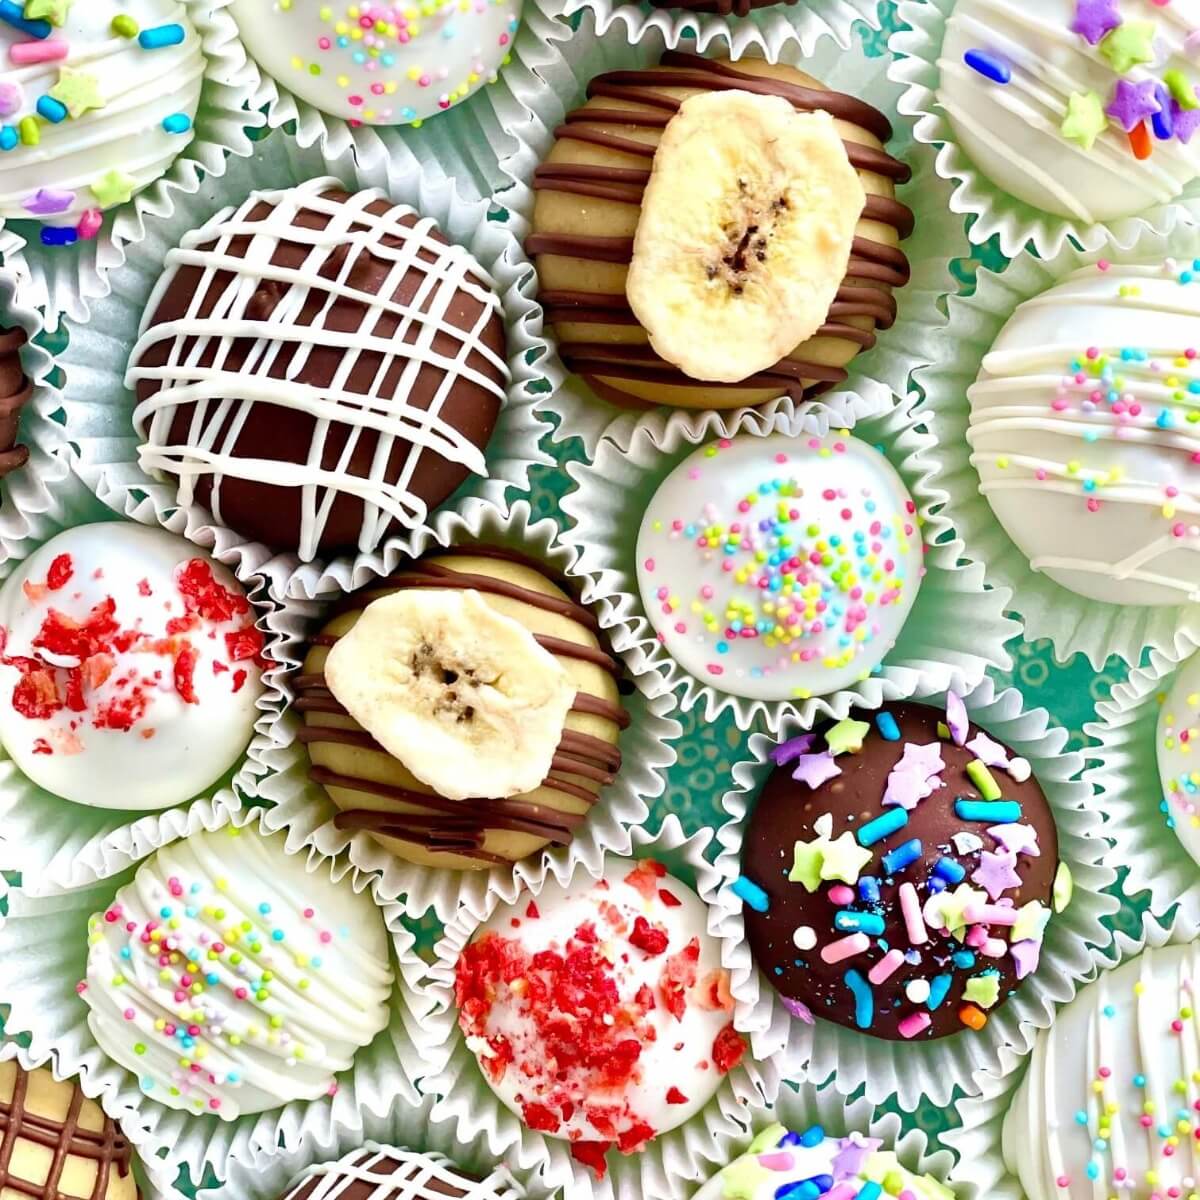
Beyond their taste, cake truffles boast an inherent elegance. Their spherical shape and smooth coating make them visually appealing, easy to handle, and a sophisticated addition to any dessert spread. The ability to customize them endlessly with various coatings, sprinkles, and even internal mix-ins means each batch can be a unique expression of your creativity or perfectly matched to a specific theme. This adaptability is part of their charm, making them a go-to for bakers looking to impress without overcomplicating things. They're a testament to the idea that sometimes, the best things come in small packages.
Essential Tools for Crafting the Perfect Cake Truffles
While the creation of these delightful treats might seem intricate, the truth is that a basic cake truffles recipe requires minimal specialized equipment. Most of what you'll need can likely be found in a standard home kitchen. Having the right tools, however, can significantly streamline the process and ensure a more uniform, professional-looking result. Here’s a breakdown of the essential gear:
- Food Processor: This is a game-changer for crumbling your cake. A food processor quickly breaks down cake into fine, uniform crumbs, which are essential for achieving the perfect texture when mixed with frosting. Uniformity ensures a consistent bind and a smoother truffle. If you don't have one, don't worry! Your hands can do the job effectively, albeit with a bit more effort and time. Simply ensure you break the cake down into very small, even pieces.
- Large Mixing Bowls: You'll need at least one generously sized mixing bowl for combining your crumbled cake with the frosting. A sturdy bowl allows for thorough mixing without spills, especially when kneading the mixture to achieve the ideal, play-doh-like consistency.
- Small Cookie Scoop (1-tablespoon): For consistent sizing, a 1-tablespoon cookie scoop is invaluable. It ensures each truffle is roughly the same size, leading to even chilling and a professional appearance. Uniformity is key for presentation and even setting. If a scoop isn't handy, small spoons can work, though they might require more careful estimation.
- Baking Sheets and Parchment Paper/Silicone Mats: You'll want at least two baking sheets. One for chilling your shaped truffles and another for placing them after they've been dipped in chocolate. Lining them with parchment paper or silicone mats prevents sticking and makes for effortless removal once the truffles are set.
- Double Boiler or Microwave-Safe Bowls: Melting chocolate requires a gentle approach to prevent burning or seizing. A double boiler offers precise, consistent temperature control, ensuring a smooth, glossy coating. Alternatively, microwave-safe bowls allow for melting in short, controlled intervals (30 seconds at a time, stirring well after each) until perfectly smooth.
- Dipping Forks or Specialized Dipping Tools: A regular dinner fork can absolutely do the trick! The tines allow excess chocolate to drip off cleanly. Specialized dipping forks, with their thinner, more widely spaced tines, can make the process even smoother, helping you achieve that perfectly even coating.
- Wire Rack: Placing dipped truffles on a wire rack set over parchment paper allows air to circulate around them, helping the chocolate coating set evenly on all sides. The parchment paper underneath catches any drips, making cleanup a breeze.
- Measuring Tools: Both dry and liquid measuring cups and spoons are crucial for accurate ingredient amounts. Consistency is key in baking, and precise measurements ensure your cake truffles turn out perfectly every time.
Mastering the Cake Truffles Recipe: A Step-by-Step Guide
Making cake truffles is a process that rewards patience and a little planning, primarily due to the necessary chilling times. Here’s how to bring these delightful spheres to life, whether you’re starting with a fresh cake or repurposing leftovers.
Ingredients You'll Need:
- Cake Base:
- 1 (18 1/4 ounce) box cake mix (any flavor) + ingredients called for on the box (typically eggs, oil, water), OR
- Approximately 4-5 cups of cooled, crumbled leftover cake (e.g., vanilla, chocolate, red velvet, funfetti)
- Frosting:
- 1 (16 ounce) can cream cheese frosting, OR
- Homemade buttercream (about 1-1.5 cups), OR
- Another preferred frosting type (e.g., chocolate ganache, vanilla bean)
- Chocolate Coating:
- 1 (1.5 lb) package chocolate bark, melting wafers, or good quality chocolate chips (milk, dark, or white chocolate)
- Optional Decorations:
- Candy sprinkles
- Melted contrasting chocolate (for drizzling)
- Crushed nuts, shredded coconut, edible glitter, finely crushed cookies
Directions for Your Delicious Cake Truffles Recipe:
- Prepare Your Cake: If using a box mix, follow the package directions to bake a 13x9 inch cake. Allow the cake to cool completely, preferably at room temperature, before proceeding. If using leftover cake, ensure it is also at room temperature. Tip: A slightly firm, cooled cake crumbles more cleanly.
- Crumble the Cake: Once cooled, crumble the cake into a large mixing bowl. This is where your food processor comes in handy for uniform crumbs. Pulse the cake until it resembles fine crumbs. If crumbling by hand, ensure there are no large lumps and remove any overly crusty edges from the pan, which can affect the truffle's texture.
- Mix with Frosting: Add about 3/4 of the can of cream cheese frosting (or 1 cup of homemade frosting) to the crumbled cake. Mix thoroughly. You can do this by hand, wearing food-safe gloves, or with a sturdy spoon. The goal is to achieve a consistency that resembles dense dough or play-doh – moldable, but not sticky or overly wet. Add more frosting, a tablespoon at a time, if the mixture is too dry to hold its shape. This step is crucial for the truffle's texture!
- Roll the Truffles: Using your 1-tablespoon cookie scoop or a small spoon, scoop out portions of the cake mixture. Roll them gently between your palms to form smooth, uniform spheres. Place the rolled truffles on a baking sheet lined with parchment paper.
- Chill for Firmness: Once all truffles are rolled, place the baking sheet in the refrigerator for at least 30-60 minutes. This chilling time is essential, as it helps the truffles firm up, making them easier to dip and preventing them from falling apart in the warm chocolate.
- Melt the Chocolate Coating: While the truffles are chilling, prepare your chocolate coating. Using a double boiler or microwave-safe bowl, gently melt your chocolate bark or wafers. If using the microwave, heat in 30-second intervals, stirring well after each, until smooth and fluid. Be careful not to overheat, as this can cause the chocolate to seize or burn. For advanced dipping techniques and chocolate handling, refer to cake truffles recipe - Article 2.
- Dip and Decorate: Remove the chilled truffles from the refrigerator. Using a dipping fork or regular fork, carefully submerge one truffle at a time into the melted chocolate. Tap the fork gently against the side of the bowl to allow excess chocolate to drip off. Immediately transfer the dipped truffle to a clean parchment-lined baking sheet or a wire rack set over parchment paper. If decorating with sprinkles or other toppings, do so immediately while the chocolate is still wet.
- Set the Coating: Once all truffles are dipped and decorated, return the baking sheet to the refrigerator for another 15-30 minutes, or until the chocolate coating is completely set and firm.
Customization and Flavor Twists
The beauty of a cake truffles recipe lies in its endless possibilities for customization. Don't limit yourself to just vanilla cake and chocolate coating! Here are some ideas to inspire your creativity:
- Cake Flavors: Experiment with red velvet cake and cream cheese frosting, lemon cake with a lemon glaze coating, or even spiced carrot cake for a seasonal twist. Funfetti cake with white chocolate coating and extra sprinkles always brings a smile.
- Frosting Pairings: Match your cake flavor with complementary frosting – chocolate cake with peanut butter frosting, or vanilla cake with almond-flavored buttercream.
- Coating Options: Besides milk or dark chocolate, try white chocolate (plain or colored with food-grade oil-based dyes), butterscotch chips, or even a simple ganache.
- Creative Toppings: Beyond classic sprinkles, consider crushed oreos, finely chopped nuts (pecans, walnuts, pistachios), shredded coconut, a drizzle of contrasting melted chocolate, edible glitter, or even a dusting of cocoa powder for an elegant finish.
- Internal Add-ins: Mix a teaspoon of liqueur (like Kahlua or Grand Marnier) into your cake mixture for an adult twist, or add mini chocolate chips or finely chopped dried fruit.
Conclusion
Creating homemade cake truffles is a truly rewarding culinary adventure. This comprehensive cake truffles recipe transforms humble cake into exquisite, bite-sized delights that are as fun to make as they are to eat. With minimal equipment and a few hours of enjoyable work (including crucial chilling time!), you can produce a treat that's perfect for gifting, entertaining, or simply indulging your own sweet tooth. So, gather your ingredients, embrace the process, and get ready to enjoy the magic of these irresistible, perfectly portioned morsels.
