The Sweet Art of Cake Truffles: Transforming Simple Bites into Decadent Delights
There's something truly magical about taking a beloved dessert and transforming it into an entirely new, bite-sized sensation. Enter the glorious world of the cake truffles recipe! These irresistible morsels, often known as cake balls, are not just a clever way to repurpose leftover cake; they are a decadent treat in their own right, offering a concentrated burst of flavor and a delightful texture that will have everyone reaching for more. Imagine the comforting taste of vanilla birthday cake, perfectly blended with creamy buttercream, then enrobed in a rich, snappy chocolate coating. That's the promise of cake truffles – pure celebration in every single bite. Whether you're looking to extend the joy of a birthday party, create unique edible gifts, or simply satisfy a sudden sweet craving, mastering the cake truffles recipe is a culinary adventure worth embarking on. What makes them so captivating is their versatility; they can be customized to suit any occasion, theme, or flavor preference, making them a consistently popular choice for everything from bridal showers to holiday gatherings.Essential Tools for Truffle Triumphs: Setting Yourself Up for Success
While the allure of homemade cake truffles might seem sophisticated, the good news is that creating these elegant spheres requires minimal specialized equipment. Most home bakers likely already possess the essential tools, making this an accessible project for almost anyone. Understanding *why* each tool is beneficial will help streamline your truffle-making process and ensure beautifully consistent results.Crumbling & Mixing with Ease
- Food Processor: This is your secret weapon for efficiency. A food processor quickly and effortlessly breaks down your cooled cake into fine, uniform crumbs. This consistency is crucial as it helps the cake bind better with the frosting, leading to a smoother, more pliable "dough." If you don't have one, don't despair! Large mixing bowls and your clean hands will work just fine, though it will take a little more elbow grease to achieve those fine crumbs.
- Large Mixing Bowls: Indispensable for combining your cake crumbs with frosting. Opt for sturdy bowls that give you plenty of room to mix thoroughly without spills.
Shaping & Chilling for Perfect Form
- Small Cookie Scoop (1-tablespoon): For consistent, perfectly portioned truffles every time, a 1-tablespoon cookie scoop is invaluable. It ensures all your truffles are roughly the same size, which is not only aesthetically pleasing but also helps them chill and set evenly. If a scoop isn't available, small spoons can certainly serve the same purpose; just aim for uniform sizes.
- Parchment Paper or Silicone Mats: Line your baking sheets with these for easy removal of your shaped truffles, both before and after dipping. We recommend having at least two sheets ready; one for chilling the shaped cake balls and another for letting the freshly dipped truffles set. This prevents sticking and makes cleanup a breeze.
Melting & Coating Like a Pro
- Double Boiler or Microwave-Safe Bowls: Melting chocolate requires a gentle hand to prevent scorching or seizing. A double boiler provides consistent, indirect heat, which is ideal. Alternatively, microwave-safe bowls allow for convenient melting in short, controlled intervals, stirring frequently. Whichever method you choose, avoid introducing any water to your melting chocolate, as this can cause it to seize and become unusable.
- Dipping Forks or Regular Forks: To achieve that smooth, even chocolate coating, you'll need a tool that allows excess chocolate to drip off cleanly. Specialized dipping forks are fantastic, but a regular kitchen fork with a few tines bent can work surprisingly well.
- Wire Racks: Placed over parchment-lined surfaces, wire racks are perfect for allowing air to circulate around your dipped truffles, helping the chocolate coating set evenly. They also catch any excess chocolate drips, keeping your workspace tidy.
Precision & Preparation
- Measuring Tools: Accurate measurements are the foundation of consistent baking results. Keep both dry and liquid measuring cups and spoons within easy reach to ensure your cake and frosting ratios are just right.
Your Ultimate Cake Truffles Recipe: A Step-by-Step Guide
This cake truffles recipe, famously popularized by Bakerella, might seem time-consuming at first glance, especially if it's your inaugural attempt. The key is planning, as chilling times are essential for achieving the perfect texture and making the dipping process manageable. We recommend planning for a two-day process to allow for adequate chilling.Ingredients You'll Need
While you can certainly start with leftover cake, for a planned batch of truffles, using a box mix is a reliable and easy way to begin. This recipe yields a generous amount, perfect for sharing!
- 1 (18 1/4 ounce) box cake mix (any flavor; vanilla or chocolate are classic choices)
- 3 large eggs (or as specified by your cake mix instructions)
- 1/3 cup vegetable oil (or as specified by your cake mix instructions)
- 1 1/3 cups water (or as specified by your cake mix instructions)
- 1 (16 ounce) can cream cheese frosting (or any buttercream-style frosting; cream cheese adds a delightful tang)
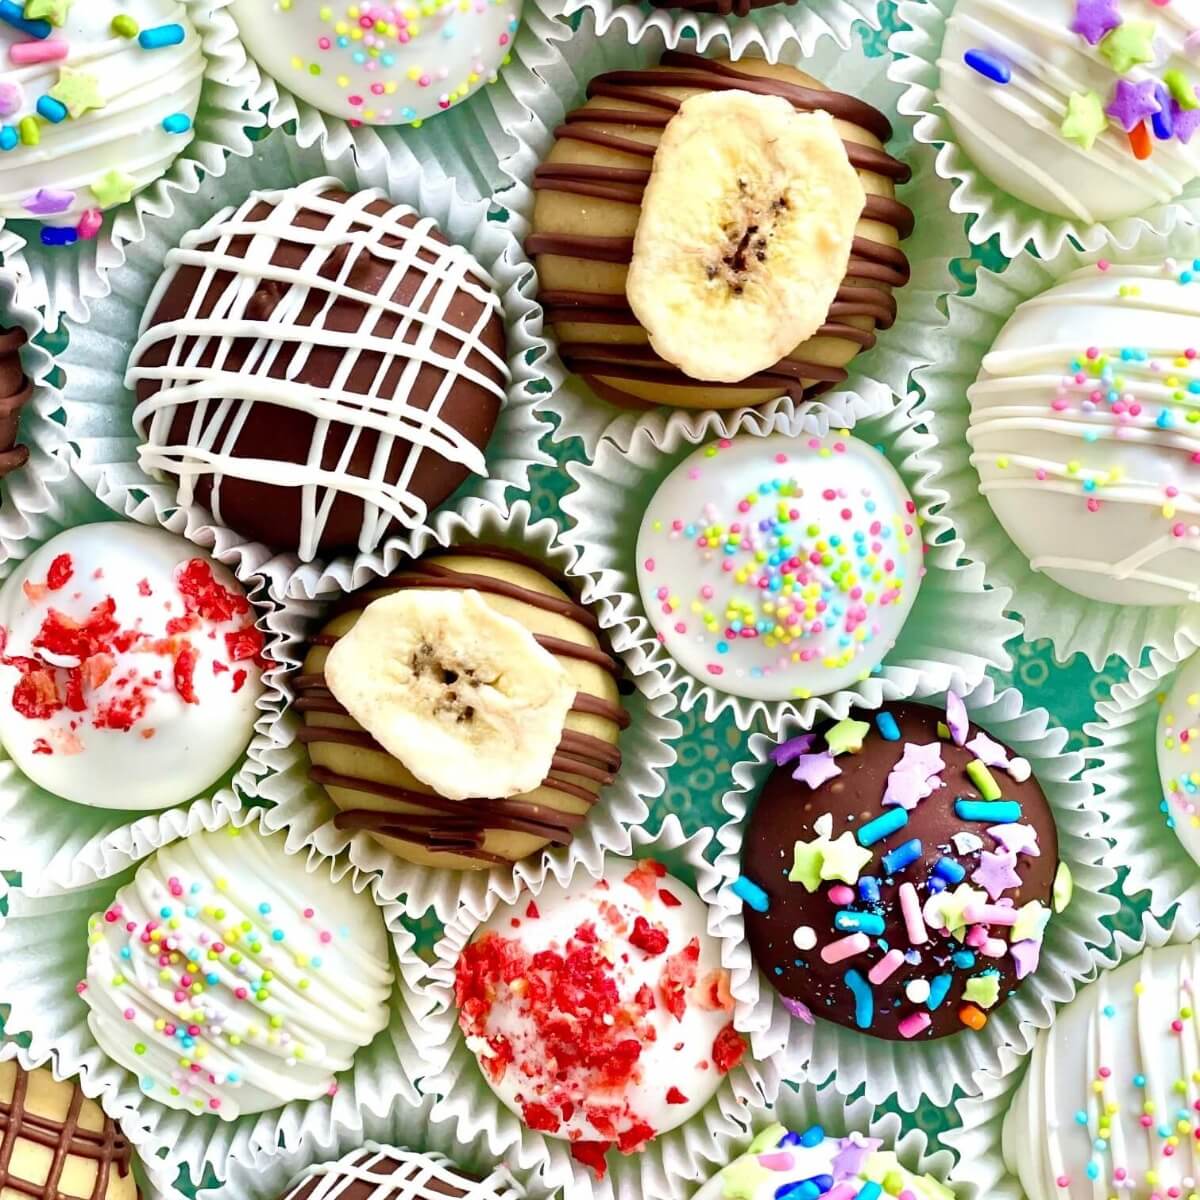
- 1 (1 1/2 pound) package chocolate bark, melting wafers, or good quality chocolate chips (milk, dark, or white chocolate work beautifully)
- Wax paper or parchment paper (for various stages)
- Optional decorations: Candy sprinkles, melted chocolate chips for drizzling, chopped nuts, edible glitter.
Preparation Day 1: Bake, Crumble, & Mix
- Bake the Cake: Prepare the cake mix according to the package directions for a 13x9 inch cake. Once baked, allow the cake to cool *completely* in the pan on a wire rack. This step is crucial; attempting to crumble a warm cake will result in a messy, sticky texture that won't form well into truffles.
- Crumble the Cake: Once fully cooled, transfer the cake to a large mixing bowl. Using your hands or, ideally, a food processor, crumble the cake into fine, even crumbs. Be sure to pick out any overly crusty or darker parts from the edges of the pan, as these can affect the smooth texture of your truffles.
- Combine with Frosting: Add the entire can of cream cheese frosting to the cake crumbs. Using your hands (which is truly the best tool here!), thoroughly mix the cake crumbs and frosting until a uniform "dough" forms. The mixture should be moist enough to hold together when pressed, but not overly wet or sticky. This is where the magic happens – the cake and frosting become one cohesive, delicious base for your truffles.
- Initial Chill: Cover the bowl with plastic wrap and refrigerate the mixture for at least 1-2 hours, or until firm enough to roll. This firming step is essential for easy shaping.
Preparation Day 2: Shape, Chill, & Dip
- Shape the Balls: Line a baking sheet with parchment paper or a silicone mat. Using your 1-tablespoon cookie scoop, portion out the cake mixture and roll it into smooth, compact balls. Place them on the prepared baking sheet.
- Second Chill: Once all the cake balls are shaped, return the baking sheet to the refrigerator for another 30-60 minutes. This chilling helps the truffles firm up even more, making them easier to dip and ensuring the chocolate coating sets quickly without cracking.
- Melt the Chocolate: While the truffles are chilling, prepare your chocolate coating. Using a double boiler or microwave, gently melt your chocolate bark or wafers. If using the microwave, heat in 30-second intervals, stirring well after each, until smooth and fully melted. Stir until completely smooth.
- Dip & Decorate: Using a dipping fork or a regular fork, carefully submerge one cake truffle into the melted chocolate. Tap the fork gently against the side of the bowl to allow any excess chocolate to drip off. This creates a thin, even coating. Immediately transfer the dipped truffle to a clean, parchment-lined baking sheet or a wire rack set over parchment paper. While the chocolate is still wet, sprinkle with your chosen decorations (sprinkles, chopped nuts, etc.).
- Final Set: Repeat the dipping process with the remaining truffles. Once all are dipped and decorated, refrigerate them for at least 15-30 minutes, or until the chocolate coating is completely set and firm.
Unlock Your Creativity: Customizing Your Cake Truffles
The beauty of the cake truffles recipe lies in its infinite possibilities for customization. Don't be afraid to experiment with different flavor combinations and decorative flourishes to make them truly your own. For more advanced techniques and creative flair, check out our guide on advanced cake truffle decorations.- Flavor Combinations:
- Classic Birthday: Vanilla cake with vanilla buttercream and white chocolate coating, adorned with rainbow sprinkles.
- Rich Chocolate: Chocolate cake with chocolate fudge frosting and dark chocolate coating.
- Red Velvet: Red velvet cake with cream cheese frosting and a white chocolate shell.
- Lemon Zest: Lemon cake with lemon cream cheese frosting, coated in white chocolate and a sprinkle of lemon zest.
- Coatings & Toppings:
- Beyond traditional chocolate, use candy melts in various colors for vibrant truffles.
- Drizzle contrasting melted chocolate over the set truffles for an elegant touch.
- Roll them in finely chopped nuts (pecans, walnuts, almonds), shredded coconut, crushed cookies (Oreos!), or even freeze-dried fruit powder.
- A dusting of cocoa powder or powdered sugar offers a more rustic, understated finish.
Troubleshooting Tips for Perfect Cake Truffles
Even with the best recipes, sometimes things don't go exactly as planned. Here are a few common issues and how to troubleshoot them:- Mixture Too Sticky to Roll: This often means you have too much frosting or the cake wasn't cooled completely. Add a little more finely crumbled cake (if you have extra) or a tablespoon of powdered sugar, mix well, and chill longer.
- Mixture Too Dry/Crumbly: You might not have enough frosting. Add another tablespoon or two of frosting, mix thoroughly, and ensure it's well-chilled before rolling.
- Chocolate Seizing: This happens when even a tiny drop of water gets into your melted chocolate, or if it's overheated. Unfortunately, seized chocolate is often irreversible. To avoid this, use a completely dry bowl and utensils, and melt slowly over low heat or in short microwave bursts. For more in-depth solutions to common chocolate issues, refer to our guide on working with chocolate coatings.
- Cracked Coating: This usually occurs if the truffles are too cold when dipped into warm chocolate. Allow the chilled truffles to sit at room temperature for about 5-10 minutes before dipping. The temperature difference should be less extreme.
